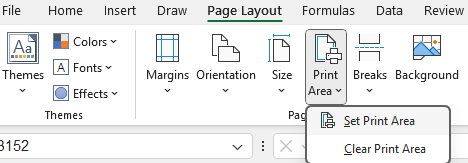
You don’t have to print everything on the excel sheet. You can set the print area, to print just the parts you want to.
These sections do not need to be continuous. You can either select the different sections, while holding down the Ctrl key, or use the Add to Print Area button, see below for more details.
Set Print Area.
Select the cells that you want to print.
On the Page Layout Menu, click Print Area, and choose Set Print Area. Or use the keys: Alt P, R, S.

Add to Print Area
Select the cells you want to add to the Print Area.
Go to Page Layout Menu, Print Area, and choose Add to Print Area. Note that the Add to Print Area is now showing, because we have Set the Print Area. Keys: Alt, P, R, A

Change the order of the Print Area.
When you add to the print area, it puts this newly added area at the end of the areas to be printed. If this is not what you want then you can change the order of the printing. The way to do that is to go to the Formulas Menu and click Name Manager. Keys: Alt, M, N.

Find the Print_Area for the sheet you are on and rearrange the order of the areas.
Change the order of the sections, from:
=’SheetName’!$A$1:$H$173,’SheetName’!$X$4:$AB$55,’SheetName’!$K$4:$T$17
To:
=’SheetName’!$A$1:$H$173,’SheetName’!$K$4:$T$17,’SheetName’!$X$4:$AB$55
You can adjust the print area in here too.
Of course, this is not only good for actual printing, but if you are exporting to a PDF then all the same rules apply. You can do this either, by “Printing” to a PDF, (Ctrl P and choose a PDF maker) or saving the file as a PDF. (File, Save As, and choose PDF under File Type.) Either will only send the print area (unless you specify otherwise.)